Referring to the methods of abdominal exercises to reduce fat, Crunch is definitely indispensable. So do you understand what Crunch is? How to do Crunch properly? What are the benefits of Crunch? Do not skip the following article.
What is Crunch?
Crunch is a popular sit-up exercise that requires no equipment.
Effective to help you quickly own a slim waist, no excess fat, flat abdominal muscles.
According to the trainers, the Crunch exercise is suitable for both men and women who need to lose excess fat quickly in the abdominal area.
What are the pros and cons of crunches?
Crunch exercise brings a lot of different benefits besides helping you have a toned bust. The exercise also helps you stabilize your body and build core endurance, but crunches also have some advantages and disadvantages:
Advantage
Not only are six pack abs exercises, crunches also bring more effects than that.
- The first effect, of course, is to help your second round slimmer. Proper abdominal crunches will work the abdominal muscles. The frequency of activity is long enough, gradually the muscles will emerge, helping the abdomen to tighten.
- Crunch is also an exercise to help you regulate your breathing. When doing Crunch, you need to learn how to breathe deeply, which can clear the respiratory system and give you healthier lungs. This exercise also helps us to regulate our moods effectively.
- Crunching doesn’t take too much effort, and doesn’t require a lot of equipment and space to practice. So you can save a lot of money and time for this exercise. People with weak physical strength can also practice.
Disadvantage
Focusing only on a certain muscle group will also form a few disadvantages for the practitioner:
- Target only the abs. The crunch doesn’t affect other core muscles, so it may not be the best exercise. If you’re looking to strengthen your entire core, this isn’t the ideal exercise.
- Risk of back and neck injury. Your spine flexes when crunching. This can put stress on your back and neck, and increase your risk of injury in these areas.
- Likely unsafe for older persons. Because of the flexibility required to perform the crunch, crunches may not be safe for older persons. Especially those who have had back or neck injuries.
The latest correct way to practice Crunch
Detailed instructions on how to perform this Crunch exercise are as follows:
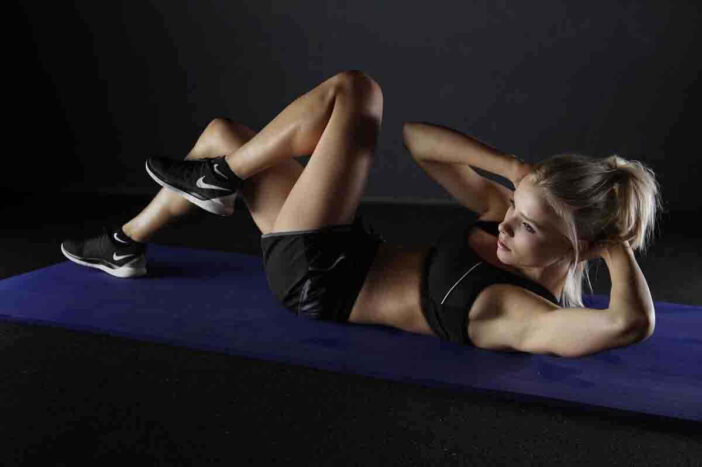
- Prepare to lie on your back on the yoga mat, then bend your knees and place your feet firmly on the mat. At this point, the knees are about 90 degrees and the hands are placed slightly behind the head. This is the starting position of the exercise.
- Perform the exercise by pushing your back down onto the mat and lifting your shoulders off the floor.
- Continue to push back strongly, raising your shoulders about 10cm off the floor and your lower back still under the mat. When lifting your shoulders to the highest position, squeeze your abs, exhale and hold this position for 1-2 seconds.
- Inhale and slowly lower your body to the floor to return to the starting position.
- Repeat the entire movement to continue the exercise, perform 15 times/set, 3 sets/exercise and rest 30 seconds between sets.
The Most Basic Crunch Exercises (Crunch Variations)
1. Basic crunches
- Step 1: Lie on the exercise mat, feet up, feet touching the mat. You put your hands behind your neck, elbows spread out to the sides.
- Step 2: Put force into the abdomen to lift the body. Note that you do not use your hands to lift your neck, your palms are always slightly behind.
- Step 3: Lift your body up about 30cm from the floor, hold for 2-3 seconds and lower your body.
- Step 4: Repeat the action.
2. Intercostal flexion
- Step 1: Lie on the exercise mat, feet up, feet touching the mat. Two arms outstretched.
- Step 2: Keeping your feet in place, your left hand is behind your ear. Bend over and twist your waist to the right so that your left elbow touches the knee of your right leg.
- Step 3: Hold for 1-2 seconds, then return to the original position.
- Step 4: Switch sides and continue to do 25-30 reps for one set.
3. Reverse crunches
- Step 1: Lie on the exercise mat, feet up, feet touching the mat. Or the hand is straight, the hand is down.
- Step 2: Keep your upper body still and lift your butt off the ground. At this time, the legs also lift up until the knees are almost touching the chin.
- Step 3: Lower your butt, push your legs out until your thighs are perpendicular to the floor.
- Step 4: Continue to lift your butt, crunch your stomach and push your legs in. Do it 20-30 times.
4. Crunches on a yoga ball
- Step 1: Place your back and buttocks on the yoga ball, feet on the ground, head at an angle. You put your hands behind your neck, elbows spread out to the sides.
- Step 2: Put force into the abdomen to lift the body. Note that you do not use your hands to lift your neck, your palms are always slightly behind.
- Step 3: Lift your body up about 30cm from the floor, hold for 2-3 seconds and lower your body.
- Step 4: Continue repeating the exercise.
5. Bicycle crunches
- Step 1: Lie flat on the mat. You put your hands behind your neck, elbows spread out to the sides.
- Step 2: Lift your legs up about 50 cm from the ground. Bring your left leg in and lift it up, and at the same time lift your body, squeeze your abs and twist your body so that your right elbow touches the knee of your left leg.
- Step 3: Twist to change sides, right leg is bent, left foot is straight out, left elbow touches right knee
- Step 4: Do 25-30 reps.
6. Bend your stomach to push your legs straight
- Step 1: Lie flat on the mat. Both legs push straight up, perpendicular to the floor. Straight arm, hand down.
- Step 2: Squeeze your abs, lift your hips and waist up high. Then lower and repeat. Note that while exercising, the upper body is always fixed.
- Step 3: Repeat 25-30 times for each set.
Crunch training schedule
With Crunch exercises you can practice every day, 1-2 sets or more each day depending on your fitness status. We suggest the following Crunch training schedule suitable for both men and women:
- Day 1: 2-3 sets of basic crunches
- Day 2: 2-3 sets of cycling sit-ups
- Day 3: 2-3 sets of sit-ups on yoga balls
- Day 4: 2-3 sets of reverse sit-ups
- Day 5: 2-3 sets of intercostal flexion
- Day 6: 2-3 sets of sit-ups and push-ups
- Day 7: Rest
Some notes to practice Crunch properly and effectively
If you already understand what Crunch is and how to practice Crunch, you should not ignore some of the following notes:
- Before exercising, jog for 30 to 45 minutes to warm up your body.
- Do not use your arm muscles during the exercise.
- Avoid lifting your head too high or touching your neck with your hands to gain momentum when exercising.
- You can practice in two ways, keeping your legs fixed or using your lower abs to lift your legs up rhythms with your upper body.
- Lie on the mat or whatever makes you comfortable.
- Breathe evenly, avoid holding your breath.
- Practicing Crunch properly helps to firm the abdomen, burn more calories, and lose weight effectively.
We hope our above sharing about Crunch exercises is useful and helps you quickly achieve your fat loss goals.
Read more:
Summary of 18 Exercises In Bed To Lose Belly Fat – Before Sleeping


